

Configurar Google Analytics 4 eCommerce en tu sitio puede resultar un poco confuso. Además, dado que Google Analytics no recopila automáticamente los datos de comercio electrónico de tu sitio o aplicación, debes configurarlo para usarlos en tus informes. Y los beneficios de configurarlo son inmensos.
Los datos de comercio electrónico de GA4 le ayudan a comprender cómo los clientes interactúan con sus productos y servicios. Le permiten obtener información y oportunidades para mejorar las experiencias de compra de sus clientes. Y lo que es más importante, puede ver qué es lo que más afecta a sus conversiones y los cambios que puede realizar para optimizar su estrategia de marketing.
Si necesitas una guía o referencia sencilla para configurar el comercio electrónico GA4 en tu sitio, este artículo es para ti. Analizaremos el proceso paso a paso para configurar el comercio electrónico en GA4. Además, exploraremos los beneficios de rastrear los datos de comercio electrónico en su empresa.
Así que, ¡vamos a sumergirnos de lleno!
Primeros pasos para habilitar el seguimiento del comercio electrónico en Google Analytics 4
Antes de poder habilitar el seguimiento del comercio electrónico en GA4, asegúrate de haber completado los pasos que se indican a continuación para empezar:
- Asegúrese de que su sitio implemente la funcionalidad transaccional para recopilar datos de comercio electrónico. Estas funciones pueden incluir páginas de productos, carritos de compra, páginas y botones de pago, opciones de pago, opciones de envío y más.
- Creemos que ya tienes una cuenta de Google Analytics y una cuenta de Google Analytics 4. Si no lo has hecho, consulta nuestra página reciente Lista de verificación de configuración de GA4 para ayudarle a empezar rápidamente. Incluye la creación de nuevas cuentas de análisis, la configuración de las propiedades de GA4, la adición de nuevos flujos de datos y mucho más.
- A continuación, debe seleccionar un método de recopilación de datos de análisis de comercio electrónico: Global Site Tag (gtag.js) o Google Tag Manager (GTM). Estos métodos le permiten crear etiquetas para configurar la propiedad de Google Analytics 4 para recibir los datos de seguimiento de su comercio electrónico desde su sitio web o aplicación. Si no sabes qué elegir, estas son las diferencias entre gtag.js y GTM:
Google Tag Manager frente a Global Site Tag (gtag.js)
Google Tag Manager y Global Site Tag son diferentes formas de implementar etiquetas en Google Analytics. Si bien ambas tienen el mismo propósito, su implementación es diferente.
Google Tag Manager es un sistema de administración de etiquetas basado en la web. Puede ayudarte a actualizar las etiquetas de Google y de terceros en tu sitio web o aplicaciones móviles sin tener que escribir mucho código. GTM también cuenta con funciones de colaboración y control de versiones.
Por otro lado, Global Site Tag (gtag.js) es un marco de JavaScript que puedes usar para agregar etiquetas directamente a tus aplicaciones móviles o páginas web. A diferencia de Tag Manager, gtag.js te permite usar código JavaScript en todo momento para enviar tus datos a Google Analytics.
Por lo tanto, discutiremos cómo usar GA4 con Tag Manager porque creemos que GTM es una mejor alternativa. GTM es compatible con muchas otras herramientas de seguimiento, es fácil de usar y tiene más funcionalidades.
Configuración del comercio electrónico GA4 con Google Tag Manager
Como hemos comentado, Tag Manager es más fácil de usar, más eficiente y más seguro. Además, GTM puede reducir los errores de configuración de las etiquetas, optimizar el despliegue de las etiquetas y proporcionar acceso a más funciones en una interfaz web fácil de usar.
Por lo tanto, estos son los pasos a seguir para configurar Google Analytics 4 con Google Tag Manager:
Configura Google Tag Manager para tu sitio de comercio electrónico
Puedes acceder a Google Tag Manager haciendo clic en la pestaña Todas las cuentas en la parte superior izquierda del panel de Google Analytics. A continuación, el icono del administrador de etiquetas. A continuación, haz clic en el enlace Comenzar de la casilla Google Tag Manager.

Si lo prefiere, puede visitar el Sitio de Tag Manager directamente para iniciar sesión y acceder a tu espacio de trabajo de GTM.
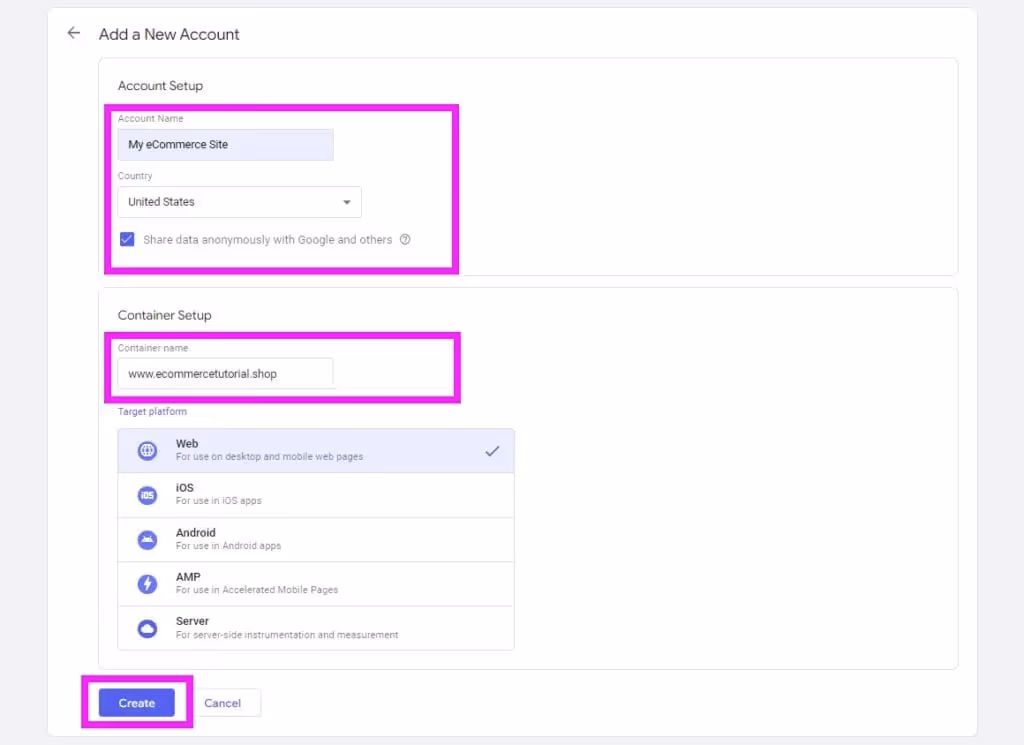
Si es la primera vez que utilizas GTM, crea una nueva cuenta y un contenedor desde la página principal de Google Tag Manager. Una cuenta en GTM te permite gestionar todas tus etiquetas en un solo espacio. Y para hacerlo, estos son los pasos a seguir:
- Haz clic en la pestaña Cuentas y, a continuación, en el botón Crear cuenta en la parte superior derecha de la página de inicio.
- A continuación, introduzca el nombre de su nueva cuenta y seleccione el país en el formulario Nueva cuenta de Tag Manager.
- A continuación, añade un nombre descriptivo en el campo Nuevo contenedor y, a continuación, selecciona un tipo de contenedor que se adapte a tu plataforma de destino.
- Por último, haz clic en Crear y lee y acepta las condiciones del servicio en la ventana Condiciones del servicio para crear tu contenedor de etiquetas de Google.
Cuando hayas creado correctamente tu contenedor GTM, aparecerá un cuadro de diálogo con las instrucciones y los códigos de instalación de Google Tag Manager. Si no estás preparado para la instalación, haz clic en Aceptar para completar el proceso más adelante.
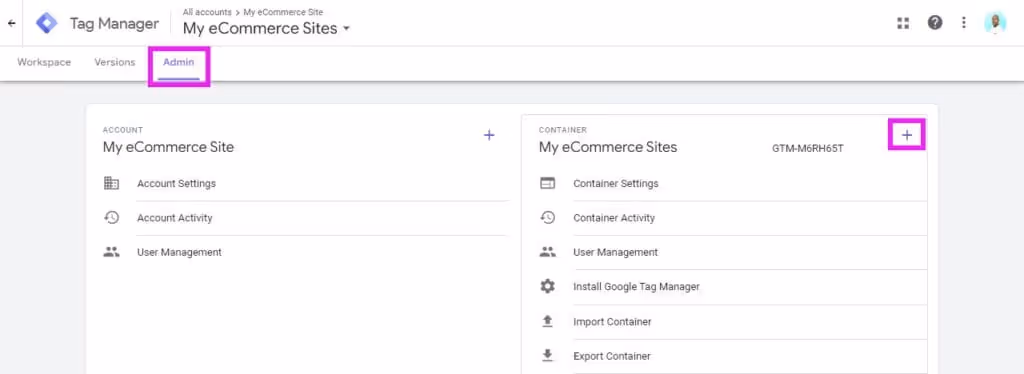
Usaremos estos códigos para instalar Google Tag Manager en tu sitio de comercio electrónico. Para incluir diferentes sitios o aplicaciones, debes crear contenedores adicionales para cada sitio que necesites medir.
Para añadir un contenedor para otras plataformas, abre la página de inicio de Tag Manager y toca la pestaña Administrador. A continuación, haz clic en el icono con el signo más situado en la esquina superior derecha del recuadro del contenedor y, a continuación, en Crear un contenedor junto a la cuenta de GTM. Recuerda que no necesitas crear una cuenta nueva para cada nueva aplicación o sitio web.
Instala Google Tag Manager en tus aplicaciones o páginas web
Para instalar Tag Manager en tu sitio, debes añadir un pequeño fragmento de código en tus páginas web para permitir que el sitio se comunique con los servidores de etiquetas de Google y Google Analytics.
El código de etiqueta de configuración GA4 declara los ajustes de las etiquetas GA4, establece cookies y envía eventos de medición mejorados y recopilados automáticamente.
Si necesitas instalar Tag Manager en tu aplicación móvil, consulta esta documentación para desarrolladores: Introducción al etiquetado móvil.
El uso de Tag Manager en dispositivos móviles te ayuda a medir la interacción de los usuarios con tus productos de comercio electrónico y aplicaciones. También modifica la forma de configurar la aplicación sin tener que reconstruir ni volver a enviar los códigos de la aplicación en las tiendas de aplicaciones.
Cómo instalar el contenedor GTM en su sitio de comercio electrónico
Para instalar los contenedores GTM en tu sitio, debes tener acceso a tu sitio web o código móvil. Para hacerlo, sigue los pasos que se indican a continuación:
- En Google Tag Manager, haz clic en Workspace.
- A continuación, haz clic en el ID de tu contenedor, con el formato GTM-XXXXXX, a la derecha de la pestaña Espacio de trabajo. Y cuando hagas clic en el ID, se abrirá la casilla Instalar Tag Manager.
- Por último, siguiendo las instrucciones del cuadro Instalar Tag Manager: copia y pega los fragmentos de código en tus páginas web. <body>Es decir, coloca el <script>fragmento de código en la <head>salida HTML de tu página web y coloca el <noscript>fragmento de código inmediatamente después de la etiqueta.
Nota: Si utilizas un sistema de gestión de contenido de comercio electrónico, puedes encontrar un complemento o una función que te permita instalar tus contenedores fácilmente. Por ejemplo, puedes usar el complemento GTM4WP en Wordpress para instalar GTM.
Migrar a Google Tag Manager
Si ya utilizabas Global Site Tags para realizar un seguimiento de tus interacciones de comercio electrónico y quieres usar GTM, debes migrar todas o la mayoría de las etiquetas existentes a GTM. Puedes obtener información sobre cómo hacerlo aquí: Migrar a Google Tag Manager.
Próximos pasos
Una vez que hayas añadido el contenedor de Tag Manager a tus páginas web o aplicaciones y las hayas configurado correctamente, GTM ya puede comunicarse con tu propiedad de Google Analytics. Por lo tanto, el siguiente paso es añadir etiquetas de eventos de comercio electrónico relevantes a su sitio o aplicación. Pero primero, comprendamos los eventos de comercio electrónico que deberías considerar rastrear.
Comprenda las interacciones de comercio electrónico que debe rastrear en tu sitio web o aplicación
Las interacciones de comercio electrónico son los eventos que muestran cómo se comportan los visitantes de su sitio o los usuarios de la aplicación cuando interactúan con sus productos o servicios. Además, implementar el seguimiento del comercio electrónico en tu sitio o aplicación suele consistir en medir todas o algunas de las siguientes acciones de los clientes:
- Visualización de sus productos o servicios
- Seleccionar o ver un elemento de una lista
- Agregar o eliminar un artículo de un carrito de compras
- Iniciar el proceso de pago
- Visualización y aplicación de promociones
- Realizar compras
- Solicitud de reembolsos
Por lo tanto, antes de comenzar a implementar eventos de comercio electrónico en su sitio o aplicación, es necesario pensar en las acciones que necesita medir. ¿Quieres saber cuántas personas completaron una compra? ¿Qué pasa con las personas que han realizado conversiones gracias a tus promociones?
Este primer paso es crucial porque cuando sabes qué rastrear, es más fácil determinar los eventos a medir. Hay varios eventos que Google Analytics recopila. Los eventos de GA4 incluyen dos categorías: los eventos recopilados automáticamente y los eventos que se configuran manualmente para que se recopilen.
Los eventos que debe implementar manualmente incluyen eventos recomendados y eventos personalizados. Los eventos recomendados son aquellos que tienen nombres y parámetros predefinidos en Google Analytics. Los eventos personalizados son aquellos que necesitas para definir y configurar informes personalizados para un análisis significativo.
La mayoría de los eventos de comercio electrónico que necesita son eventos recomendados. Por lo tanto, en nuestro próximo paso nos centraremos en cómo recopilar estos eventos de comercio electrónico recomendados en Google Tag Manager.
Configure los eventos de comercio electrónico de Google Analytics 4 con Google Tag Manager
Una vez que hayas instalado correctamente Tag Manager en tu sitio, añade y configura los eventos de comercio electrónico de GA4 en Tag Manager con las etiquetas y los activadores adecuados.
Como hemos comentado, los eventos de comercio electrónico recomendados son el tipo de eventos que tienen nombres y parámetros predefinidos. Además, te permiten desbloquear más medidas de interacción con los usuarios en tu sitio web o aplicación.
Google Tag Manager puede representar tus productos o servicios como conjuntos de elementos agregados como eventos de comercio electrónico. Esta matriz puede incluir cualquier parámetro prescrito y hasta 27 parámetros personalizados. Además, puede crear una colección de matrices de elementos para incluir hasta 200 elementos para un seguimiento mejor y más detallado del comercio electrónico.
Si bien no hablaremos mucho sobre la creación de eventos personalizados, el proceso no es demasiado difícil y puedes consultar el página de documentación de eventos personalizados para obtener más información.
Entonces, aquí se explica cómo configurar eventos de comercio electrónico en GA4:
Pasos para crear y configurar las etiquetas de eventos de comercio electrónico recomendadas por GA4
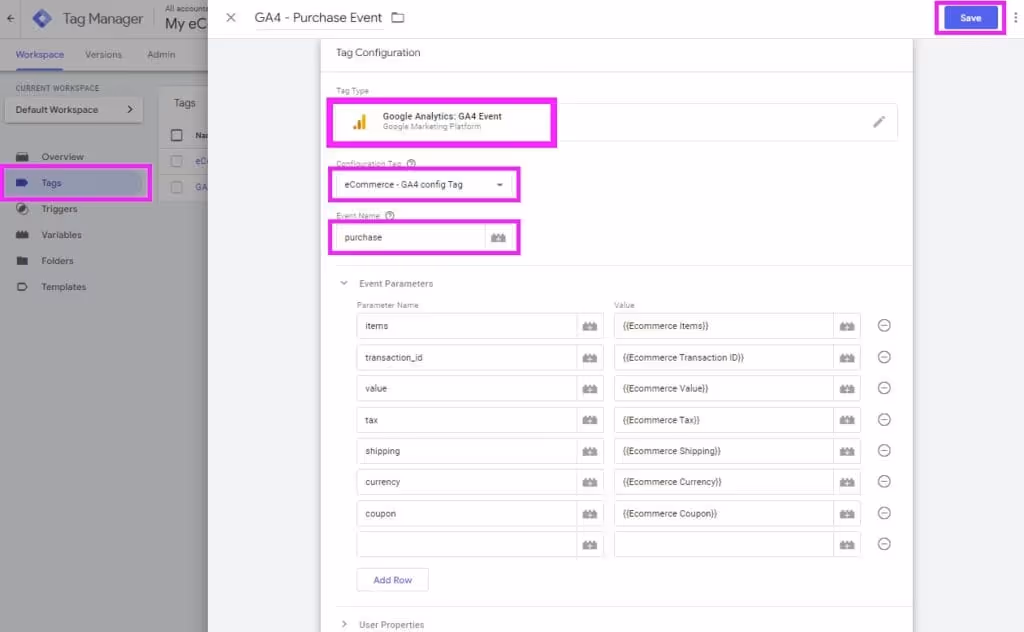
El primer paso para configurar los eventos de comercio electrónico GA4 en Google Tag Manager es configurar una etiqueta de evento GA4 de Google Analytics. Una etiqueta de evento GA4 te permite crear reglas personalizadas para recopilar los datos correctos de tu sitio o aplicación en el momento adecuado.
Deberás diseñar macros personalizadas que permitan a Google Tag Manager extraer datos dinámicos de las páginas de tus productos, como los nombres de los artículos, los precios, etc. A partir de ahí, los contenedores GTM instalados en tu sitio pasarán estos valores a tu Tag Manager.
Para nuestro ejemplo, crearemos un evento de compra. Si necesitas información general sobre cómo configurar los eventos recomendados en Google Analytics, consulta el siguiente vídeo:
https://www.youtube.com/watch?v=PEPb3uaVILk
Siga los pasos que se indican a continuación para crear y configurar una nueva etiqueta de evento de comercio electrónico GA4:
- En Google Tag Manager, haz clic en Etiquetas en el menú lateral y, a continuación, en Nuevo.
- En la parte superior del cuadro Nueva etiqueta, escribe el nombre de tu evento. Por ejemplo, «comprar».
- A continuación, selecciona «Google Analytics: GA4 Event» como tipo de etiqueta.
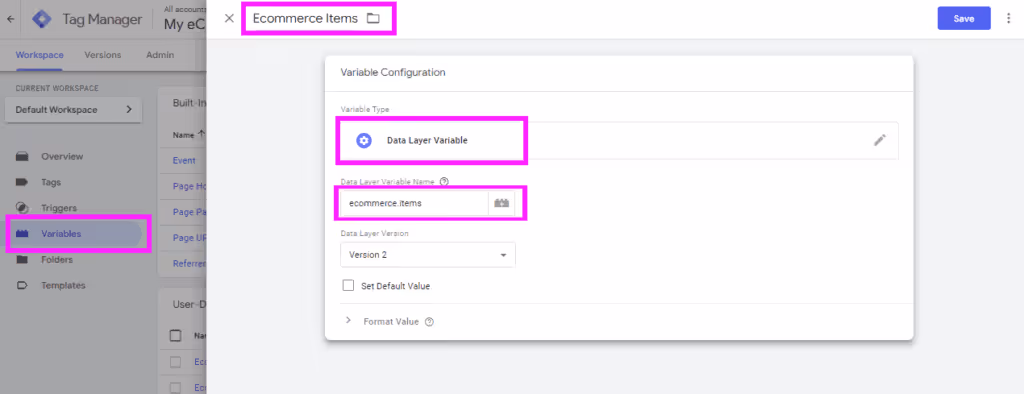
- Establezca nuevas variables de capa de datos de comercio electrónico. Para hacerlo, vaya a Variables y, en Variables definidas por el usuario, haga clic en Nuevo. Introduzca el nombre de la variable y el nombre de la variable de capa de datos correspondiente para que coincidan con cada una de las siguientes opciones en el cuadro de configuración de variables. A continuación, haga clic en Guardar:
- Artículos de comercio electrónico - ecommerce.items
- ID de transacción de comercio electrónico: ecommerce.transaction_id
- Valor de comercio electrónico - ecommerce.value
- Impuesto de comercio electrónico - ecommerce.tax
- Envíos de comercio electrónico - ecommerce.shipping
- Moneda de comercio electrónico - ecommerce.currency
- Cupón de comercio electrónico - ecommerce.coupon
- Después de configurar las variables, coloque los parámetros del evento en los pares Nombre y Valor del parámetro, debajo del cuadro Nueva etiqueta. Además, marca la casilla Enviar datos de comercio electrónico en Más ajustes. Los parámetros del evento pueden incluir cualquiera de los siguientes:
- artículos - {{Artículos de comercio electrónico}}
- transaction_id - {{ID de transacción de comercio electrónico}}
- valor - {{Valor de comercio electrónico}}
- impuesto - {{Impuesto de comercio electrónico}}
- envío - {{Ecommerce Shipping}}
- moneda - {{Ecommerce Currency}}
- cupón - {{Cupón de comercio electrónico}}
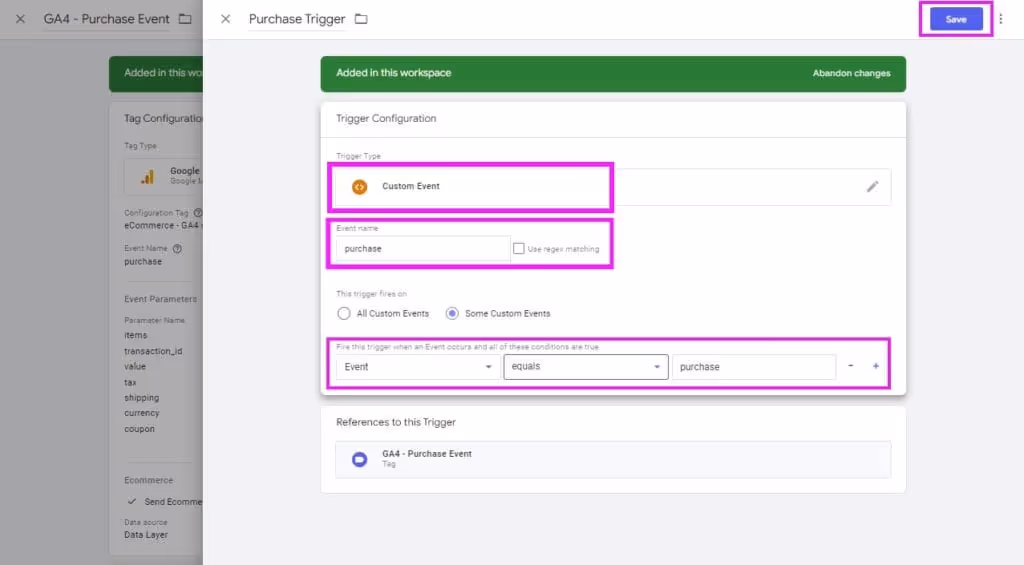
- Por último, configura tu activador para que se active cada vez que ocurra un evento en tu sitio. En el cuadro de configuración del disparador, introduce el nombre del evento al comprar, el tipo de disparador como evento personalizado y haz que este disparador se active en algunos eventos. Defina esta condición desencadenante como «El evento equivale a una compra» y guarde todos los cambios.
Nota: Puedes consultar el Referencia de eventos para obtener una lista completa de los eventos recomendados y los parámetros a enviar.
Pruebe la configuración y la configuración de su comercio electrónico GA4 en Google Analytics
Una vez que hayas terminado de configurar los eventos, es aconsejable previsualizar los cambios antes de publicar los nuevos eventos. La vista previa en Tag Manager te permite comprobar si tu configuración de GA4 está lista para rastrear tus datos de comercio electrónico antes de publicarlos en tu sitio. Las pruebas también te permiten asegurarte de que Google Analytics recopila y rastrea correctamente tus datos de comercio electrónico.
Para acceder al Tag Assistant y acceder al modo de vista previa para comprobar que las etiquetas funcionan, sigue estos pasos:
- Haga clic en Vista previa en Google Tag Manager para iniciar Asistente de etiquetas de Google en una pestaña nueva. Si hay algún error de configuración en su configuración, Tag Manager le avisará antes de que pueda continuar.
- A continuación, introduce la URL de tu sitio web. Esta URL es donde instalaste el contenedor de Tag Manager. Si encuentras errores, puedes empezar a depurar con el Tag Assistant.
- Si hay problemas con tu etiqueta, haz clic en el nombre de una etiqueta en Tag Manager para cambiar su configuración y solucionar los problemas. Por ejemplo, si un evento se desencadena con un disparador incorrecto, es decir, cuando se carga una página en lugar de hacer clic en un botón.
- Guarda los cambios y repite el proceso hasta lograr el seguimiento deseado.
Cuando tu etiqueta funcione como esperabas, ¡es hora de publicar tu espacio de trabajo actual! Para hacerlo, haz clic en Enviar en la parte superior derecha de tu administrador de etiquetas. En el cuadro Enviar cambios, revisa los cambios en tu espacio de trabajo, introduce el nombre y la descripción de la versión y, a continuación, haz clic en Publicar.
Una vez que todo esté según lo previsto y publicado, puede obtener sus eventos y parámetros de Realtime y Informes de DebugView. Estos dos informes le permiten monitorear las actividades de los usuarios de sus sitios en cuestión de segundos a medida que ocurren.
Analice sus datos de comercio electrónico en Google Analytics
Con el seguimiento del comercio electrónico GA4, es hora de analizar y obtener información sobre el comportamiento de compra de sus clientes a partir de sus datos de comercio electrónico. Puede utilizar la información para crear experiencias de cliente personalizadas, tomar decisiones empresariales informadas y mitigar los posibles riesgos y contratiempos en su negocio.
La creación de informes de comercio electrónico junto con otros canales de marketing puede brindarle una visión unificada de su estrategia de marketing, lo que le permite detectar tendencias y más oportunidades para optimizar su estrategia de comercio electrónico.
Durante años, hemos ayudado a miles de usuarios de Google Analytics de todo el mundo a crear informes de comercio electrónico personalizados y multiplataforma. Por lo tanto, si necesitas llevar tus informes de comercio electrónico al siguiente nivel, podemos ayudarte.
Capa de datos llevará todos sus datos de comercio electrónico, SEM/PPC a sus plataformas de análisis de datos o herramientas de visualización favoritas, como Google Sheets, Looker Studio, BigQuery y otras herramientas de BI.
Por lo tanto, puede confiar en nuestro conjunto de herramientas de marketing digital para ayudarlo a analizar sus datos de comercio electrónico, los datos de las campañas de marketing en redes sociales y los datos de PPC para comprender a sus clientes y mejorar sus estrategias de marketing.
¿Por qué la configuración del comercio electrónico de Google Analytics 4 es tan importante para su empresa?
Una vez que hayamos configurado Google Analytics 4 para comercio electrónico, veamos los beneficios que obtendrás después de pasar por este largo proceso.
Obtenga un seguimiento preciso y rápido de los eventos de comercio electrónico
GA4 eCommerce proporciona un seguimiento del comercio electrónico más preciso y rápido que Universal Analytics. Con más funciones y capacidades que la versión de Universal Analytics, puede realizar un seguimiento de las métricas más relevantes para su negocio.
Más aún, medir las interacciones de comercio electrónico en su sitio o aplicación tiene un impacto mínimo en la velocidad de su sitio o aplicación de comercio electrónico. Por lo tanto, seguirás ofreciendo las mejores experiencias a tus clientes a la vez que recopilas datos empresariales relevantes.
Realice un seguimiento de las interacciones de comercio electrónico entre dispositivos
Configurar el comercio electrónico GA4 para su tienda en línea lo ayudará a rastrear el comportamiento de sus clientes en varios dispositivos, incluidos ordenadores de escritorio, dispositivos móviles o tabletas. En una sola interfaz, puedes ver cómo interactúan tus clientes con tu sitio en diferentes dispositivos.
Si administras tu tienda únicamente en tu sitio web, es posible que este beneficio no sea ideal para ti. Sin embargo, rastrear a un usuario en múltiples plataformas es una función excelente para el propietario de una tienda con aplicaciones móviles.
Proporciona funciones avanzadas de informes de comercio electrónico
En comparación con Universal Analytics, GA4 es más potente y fácil de usar, lo que le permite obtener información más profunda sobre sus datos de comercio electrónico. Por ejemplo, puedes hacer un seguimiento sencillo del recorrido de un cliente desde que ve el producto hasta que lo compra para ayudarte a identificar oportunidades para mejorar la experiencia de los clientes.
Además, con una API de Google Analytics 4 con todas las funciones, puede llevar sus datos a plataformas de informes e inteligencia empresarial de terceros para obtener mejores capacidades de análisis de datos. Por ejemplo, puedes usar nuestra Gestor de consultas de API para llevar sus datos de comercio electrónico de Google Analytics a Power BI, Tableau o Qlik.
Leer más: Lo que debe saber sobre la nueva API de datos de GA4 y la API de propiedades de UA
Ofrece una mejor integración con otros productos y servicios
Google Analytics se integra perfectamente con muchas otras herramientas de productos del ecosistema de Google y con varias otras herramientas de terceros. La integración sencilla de GA4 con tus plataformas de datos preferidas te brinda más flexibilidad a la hora de usar e interpretar tus datos de comercio electrónico.
Por ejemplo, la integración de GA4 con Google Ads te permite realizar un seguimiento del rendimiento de tus anuncios para ayudarte a optimizar tus campañas en función de tus datos de comercio electrónico. Por lo tanto, esta integración te ayudará en última instancia a obtener mejores resultados y a mejorar el ROI de tus campañas publicitarias.
Finalizando
¡Ahí lo tienes! Una configuración completa de medición de comercio electrónico en Google Analytics 4. Esperamos que esta guía te haya ayudado a configurar GA4 con éxito y que ahora puedas hacer un seguimiento de las interacciones de tus clientes en tu sitio o aplicación de comercio electrónico.
Una vez que complete estos pasos, su comercio electrónico GA4 debería estar listo para rastrear el comportamiento de compra de sus clientes en su sitio. Y si bien es posible que los datos tarden algún tiempo en aparecer en tus informes de GA4, ten paciencia y vuelve a comprobarlo después de unas horas.
Recuerde que puede confiar en nuestras herramientas de informes de marketing digital para llevar sus datos de comercio electrónico de Google Analytics y otros datos de PPC/SEM a Google Sheets, Google Data Studio y otras herramientas de BI para realizar más análisis y adaptarse a sus casos de uso específicos.
Comience hoy mismo para saber cuánto podemos ayudarlo a llevar su negocio al siguiente nivel con nuestras herramientas de informes de marketing digital de primer nivel.


