

Connecting Shopify to Google Sheets lets you analyze sales, manage inventory, and build custom reports without constantly exporting CSV files. With 5.54 million active Shopify stores generating data daily, manual exports quickly become unsustainable. This guide covers four proven methods from manual CSV downloads to automated connections, so you can choose the approach that fits your reporting needs and technical comfort level.
Method Comparison Table
Why Connect Shopify to Google Sheets?
Shopify's built-in analytics work fine until you need to answer questions like "Which products sell best on Thursdays?" or "How do refund rates compare across different shipping carriers?" The admin dashboard gives you high-level numbers, but Google Sheets lets you dig into the details that matter for your specific business.
You get flexible reporting that Shopify doesn't offer. Combine orders with inventory levels. Calculate custom profit margins after advertising costs. Track lifetime value by customer acquisition source. You decide which columns matter instead of being limited to Shopify's preset reports.
Team collaboration becomes simpler. Your warehouse manager needs order data. Your accountant wants revenue breakdowns. Your marketing team tracks product performance. Sharing a Google Sheet beats giving everyone Shopify admin access with carefully configured permissions.
You're also creating automatic backups. Shopify handles disaster recovery at the platform level, but individual store data backup is your responsibility. 59% of Shopify stores have email on their website, but few have proper data backup systems in place.
The real power shows up when you combine multiple data sources. Running Google Ads, Facebook Ads, and Shopify? Pull everything into one spreadsheet and you'll see which campaigns actually drive profitable sales, not just which ones drive orders. Shopify shows you sales. Combined data shows you ROI.
The typical Shopify merchant checks their dashboard 3-4 times daily. With automated Google Sheets connections, your data stays current without the constant app switching.
Method 1: Manual CSV Export (Free, Simple, Time-Consuming)
Log into Shopify, click Export, download the CSV, import to Google Sheets. Takes 5 minutes per export.
Best for: Monthly accounting reports or one-off analysis.
The limitation: Shopify's CSV exports don't include calculated fields. Want profit after shipping costs? You're writing formulas manually. Need to combine order data with inventory? You're downloading multiple CSVs and matching them yourself.
One marketing manager spent 90 minutes every Monday doing this. At her hourly rate, those exports cost $240 monthly in lost productivity.
Method 2: Shopify App Store Solutions
The Shopify App Store has dozens of apps that automate exports to Google Sheets. Installation takes minutes: grant permissions, connect your Google account, choose which data to export, set refresh frequency.
The catch is that many apps work great for months, then break during Shopify API updates. Check recent reviews carefully. Look for apps where developers respond to support questions.
Pricing: Most charge $10-30 monthly after free trials. This works fine for a single Shopify store. But if you're also pulling Google Ads, Facebook Ads, or other platform data, you'll need separate apps for each source, costs add up fast.
Method 3: Google Sheets API Add-ons (For Developers)
Add-ons like API Connector let you query the Shopify Admin API directly from Google Sheets. You get complete control over which data you pull and how you structure it.
Best for: Developers comfortable with API documentation. If "authentication headers" and "pagination" don't scare you, this offers maximum flexibility.
Quick setup overview:
- Install API Connector from Google Workspace Marketplace
- Create a custom Shopify app following Shopify's authentication guide
- Configure API scopes (read_orders, read_products, read_customers)
- Copy your access token (shows only once)
- In Google Sheets, create API request with your token
Key limitation: Shopify's rate limits allow 40 requests per minute, with 250 records maximum per request. For large datasets, you'll need to handle pagination.
Why developers use this: You pull exactly the fields you need. No extra columns. Want just order number, customer email, and total price? Build that specific query.
Method 4: Automation with Dataslayer (Easiest Multi-Platform Option)
If you're pulling data from multiple marketing platforms, not just Shopify, using individual tools for each gets messy fast. This is where a unified connector like Dataslayer makes more sense.
When Dataslayer fits: You're tracking Shopify sales alongside Google Ads spend, Facebook campaign performance, or Google Analytics traffic. Instead of juggling four different tools, you manage everything from one place.
What makes it different: Dataslayer connects 50+ platforms to Google Sheets, Looker Studio, BigQuery, Excel... When you need to answer "Which Google Ads campaigns drive the most Shopify revenue?" you're building reports with data that automatically updates across all sources.

How to Connect Shopify to Google Sheets Using Dataslayer
Step 1: Create Your Shopify API Credentials
- Go to https://accounts.shopify.com/store-login and log in
- Navigate to Apps and sales channel settings
- Click Develop apps then Create an app
- Name your app (e.g., "Dataslayer Connector") and click Create app
- Go to API Credentials section
- Click Configure Admin API scopes
- Enable these required scopes:
- read_products
- read_customers
- read_orders
- read_fulfillments
- read_analytics
- read_inventory
- Scroll down and click Save
- Navigate to API Credentials and click Install app
- Confirm by clicking Install in the popup
- Click Reveal token once and copy your Admin API access token
Important: This token shows only once. Save it immediately in a secure location.
Step 2: Connect Shopify in Dataslayer
- Log into Dataslayer.ai
- Navigate to the Hub Account section
- Find the Shopify connector
- Click "+ Add new account"
- Paste your access token in the designated field
- Enter your store name in the correct format
Critical store name format: Enter only your store name. If your Shopify URL is https://mystore.myshopify.com, enter just mystore. Common mistakes include adding "https://", ".myshopify.com", or spaces, these will cause connection errors.
- Click Connect
Done! Your Shopify account is now available in Dataslayer's Hub Accounts section.
Step 3: Pull Shopify Data into Google Sheets
- Open Google Sheets
- Go to Extensions > Dataslayer > Create Query
- Select your Shopify connection from the Hub Accounts dropdown
- Choose your data entity (Orders, Products, Customers, etc.)
- Select dimensions (Order Date, Product Name, Customer Email)
- Select metrics (Sales, Quantity, Refund Amount)
- Apply filters if needed (date range, order status)
- Set refresh schedule (hourly, daily, weekly)
- Click Run query
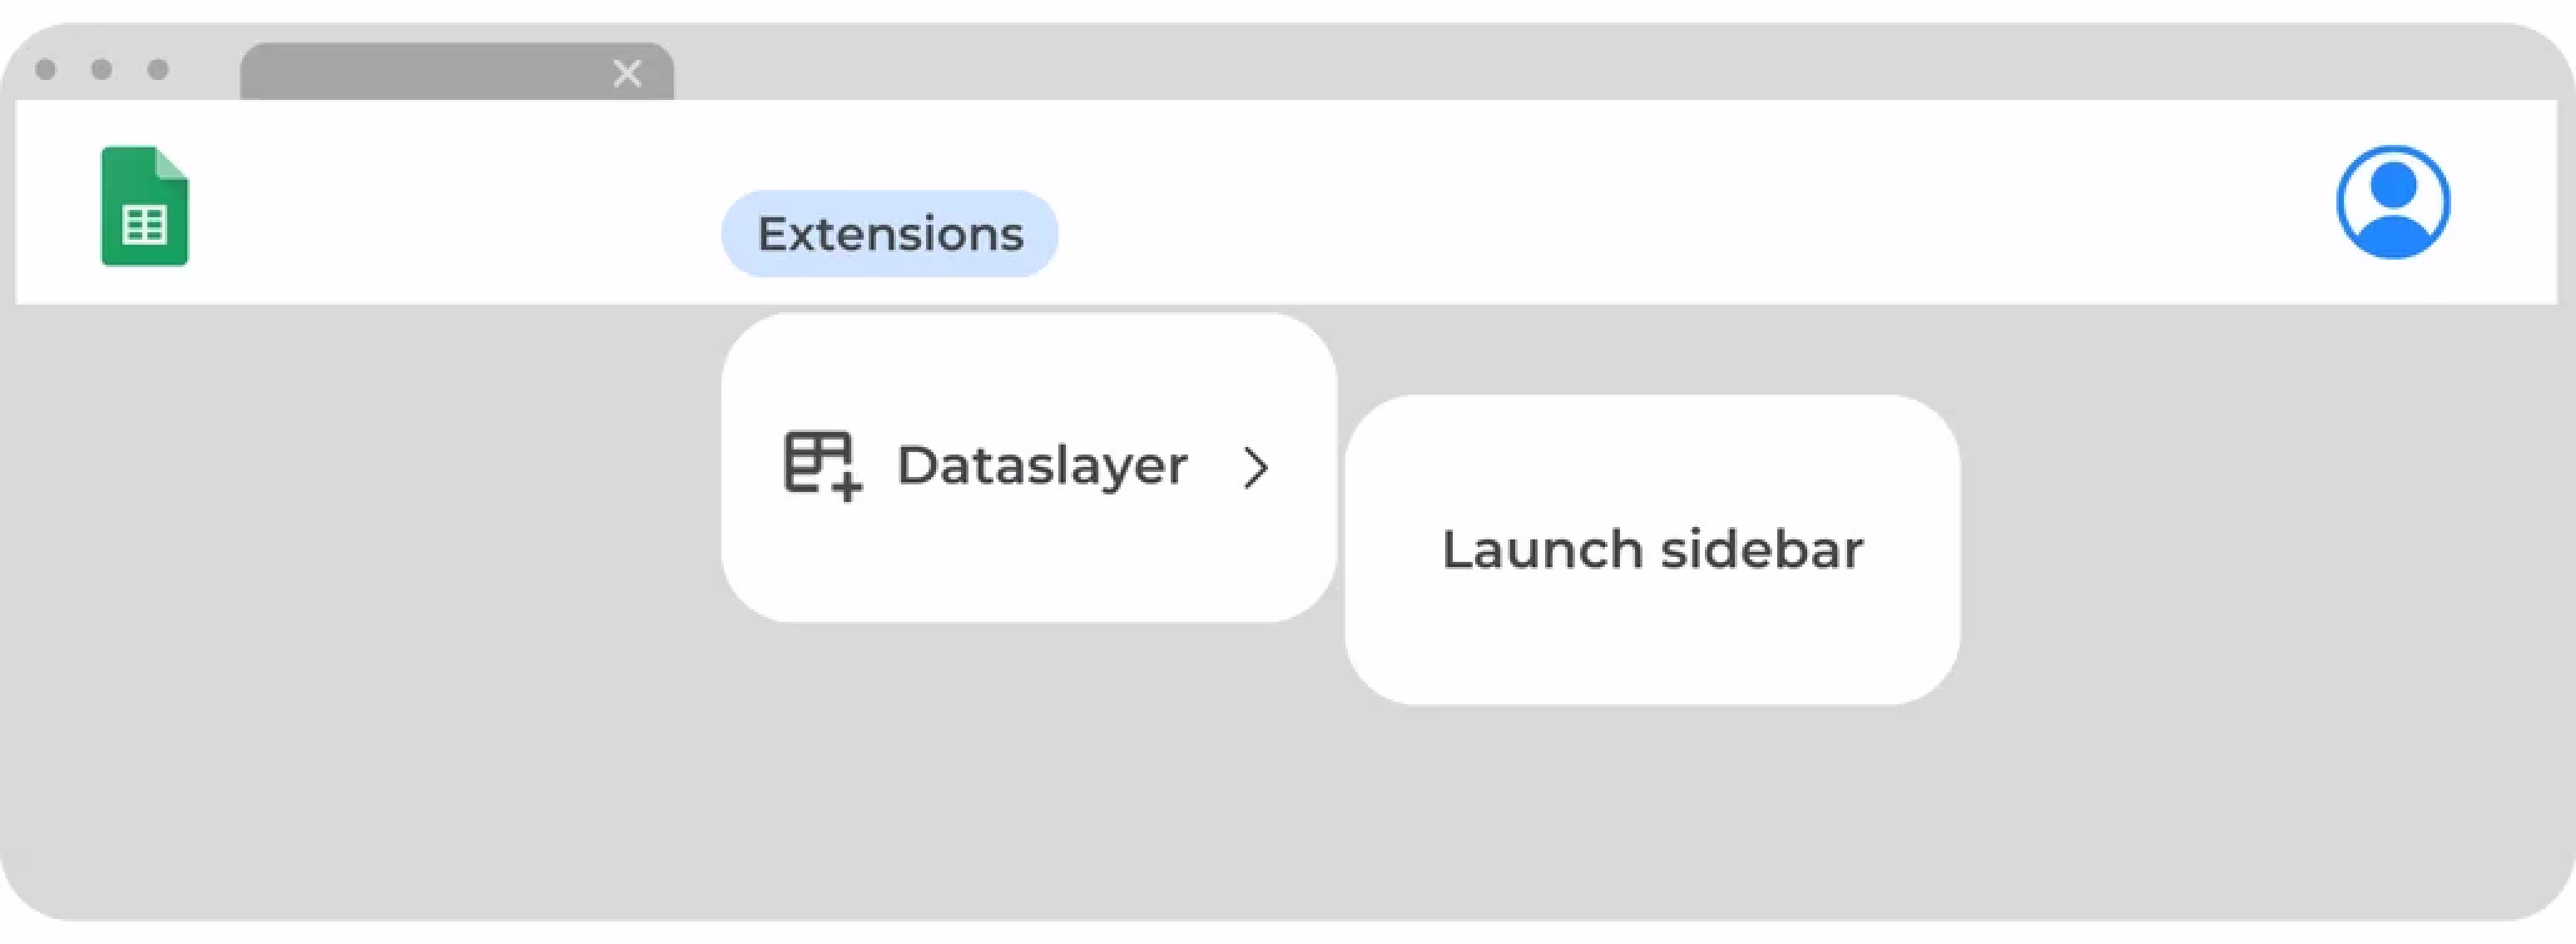
Your Shopify data appears in your sheet and updates automatically based on your schedule.
Data accuracy tip: When comparing numbers between Shopify's admin console and Google Sheets, always check the Analytics > Reports section in Shopify, not the Orders section. Different Shopify sections calculate totals differently. Learn how to avoid data discrepancies.
If you have multiple stores, repeat the authentication process for each Shopify store. You can then pull data from all stores into a single Google Sheet for consolidated reporting.
Which Method Should You Choose?
Manual CSV exports make sense if you need data once a month and your budget is $0. You'll spend time, but no money.
Shopify App Store apps work when you only need Shopify data and don't want to deal with technical setup. Budget $10-20 monthly for something reliable.
API add-ons fit developers who want control over exactly which fields they pull. You'll write custom queries but get precisely the data structure you need.
Dataslayer makes sense when you're pulling from multiple platforms, Google Ads, Facebook, LinkedIn, plus Shopify. One tool handles everything instead of juggling separate connectors for each platform.
What You Can Do With Automated Shopify Data
Once data flows automatically into Google Sheets, you can build analysis that wasn't practical before.
Combine Shopify sales with Google Ads costs in the same sheet. Calculate actual profitability per campaign: (Revenue - Ad Cost - Product Cost) / Ad Cost. You'll see which campaigns make money, not just which drive sales.
Use pivot tables to find patterns. Group by product to identify best sellers. Group by customer to spot your repeat buyers. Group by referral source to see which channels bring valuable customers versus one-time bargain hunters.
Set up conditional formatting for instant alerts. Highlight refund rates above 10%. Flag inventory below reorder points. Color-code fulfillment status. Your spreadsheet becomes a dashboard you can scan in seconds.
Calculate days since each customer's last order. Filter for people who bought 60-90 days ago but haven't returned, your re-engagement email targets. Tag customers as "High Value" (3+ orders, $500+ lifetime) or "At Risk" (no order in 90+ days). Export these segments for targeted campaigns.
Dataslayer also offers an MCP (Model Context Protocol) integration that connects your Shopify account directly to ChatGPT, Claude, or Mistral AI. Ask questions in natural language like "What were my top 5 products last month?" or "Show me customers who spent over $500 in Q4" and get answers from your actual data without building queries manually. It works with all 50+ connected platforms, not just Shopify.
FAQ
Why don't my numbers match Shopify's dashboard?
You're probably comparing different sections. Shopify's Orders page shows gross sales (including taxes and shipping). The Analytics > Reports section shows net sales. Most API connections pull from Analytics. Check Analytics > Reports > "Sales over time" to match your Google Sheets numbers. Learn more about avoiding data discrepancies.
I keep getting "Authentication failed" or "Store not found" errors
Your store name is formatted incorrectly. Enter only what comes before ".myshopify.com" with no spaces, special characters, or https://. For "my-awesome-store.myshopify.com", enter exactly my-awesome-store. See the Shopify login troubleshooting guide for details.
Can I connect multiple Shopify stores to one Google Sheet?
Yes. Most tools let you authenticate multiple stores and pull data into a single sheet. Add a "Store Name" column to identify which store each order came from, then build consolidated reports across all properties.
How do I handle customer privacy with exported data?
Use restricted Google Sheets sharing (specific email addresses only), avoid downloading to personal devices, and consider anonymizing PII columns if you're only using data for analysis. GDPR and privacy regulations apply to exported data the same as data in Shopify.
Conclusion: Match the Method to Your Situation
There's no universal "best" way to connect Shopify to Google Sheets. Your right choice depends on technical comfort, budget, and whether you need data from other platforms too.
Manual exports work if you only need data occasionally. Shopify apps handle basic automation without technical setup. API add-ons give developers complete control. Dataslayer fits when you're consolidating data from multiple marketing platforms.
The 2.1 million daily active Shopify users generate massive amounts of data. The stores that succeed use that data to make better decisions. Getting your Shopify data into Google Sheets, automatically, accurately, and consistently, lets you spot inventory problems before they become stockouts, understand which marketing actually works, and see which products drive your business forward instead of just filling orders.
Start with whichever method matches where you are right now. You can always change approaches as your needs evolve.
Need Shopify data alongside Google Ads, Facebook Ads, and 50+ other platforms? Try Dataslayer free for 15 days. Connect your marketing stack to Google Sheets, Looker Studio, BigQuery, or Power BI without juggling multiple tools. No credit card required.


